Brownie Affogato Sundaes

fruit cup

I will never understand people who actually like the flavor of coffee. Don’t get me wrong- I can enjoy a blended coffee drink with all the milk and sugar and chocolate. But the actual flavor of coffee itself? Nope!

However, my father is a lover of coffee. He truly finds the flavor itself to be something special.

So, for a dessert that both of us would love, I wanted to find a way to add coffee flavor, but control the amount for each of us. A customized coffee dessert?

Affogato was the answer. What is affogato? It’s a classic Italian treat featuring a layer of gelato with hot espresso poured over it. It’s like the Italian version of a root beer float- but hot!

However, simply buying ice cream and brewing coffee didn’t seem special enough. I wanted to actually put some effort into making dessert!

The answer? A layer of rich, homemade brownies. Honestly, brownies are the answer to nearly everything.

So, this is a dessert with layers of rich ice cream, strong coffee and gooey brownies.

To customize it, I used less coffee than everyone else- Dad got lots of coffee, I got just a sprinkle.

You ready?

INGREDIENTS:

  • 2 sticks butter 
  • 5 ounces unsweetened chocolate, chopped 
  • 1/4 cup cocoa powder 
  • 2 cups sugar 
  • 1 tablespoon vanilla 
  • 3  eggs 
  • 1 1/4 cup flour 
  • 1 cup semisweet chocolate chips 
  • four shots of espresso
  • your favorite ice cream- I used vanilla swirled with fudge and chocolate chips
  • chocolate covered coffee beans

Preheat the oven to 350. Grease a 9×13 cookie sheet (not a cake pan- they’re really good as thin, crispy brownies in this because they absorb the cream and coffee!)

In a small saucepan over medium heat, melt together butter and chocolate.

Once melted, stir in the cocoa powder. Remove from heat and cool 5 minutes.

Stir the sugar and vanilla into the chocolate mixture. Add the eggs one at a time.

Stir in the flour until half mixed. Add the chocolate chips, finish stirring!

Pour into the pan and bake for 25 minutes. Let cool completely.

To make the sundaes, take three mugs.

Put a layer of crumbled brownie, a scoop of ice cream, another brownie, more ice cream.

Pour hot coffee over the top. Top with chocolate covered coffee beans.

Serve immediately!


“Manly” Mocha German Chocolate Cake

My father is a man of few vices. Well, there’s the occasional cigar. Alright, and a whiskey neat in the afternoons. However, none of these are particularly prominent.

However, my father has one huge problem: he LOVES coffee. The man would drink it all day every day if he could. We have to remind him to keep count of how many cups he has, for the sake of his health. He would rather have a coffee with Swiss Miss stirred in than anything else. When we go out for ice cream, he opts for coffee flavored.

So, for his birthday, there had to be coffee involved. However, he is also a man of tradition, which means that German Chocolate cake must be involved. Luckily, chocolate, coffee, and coconut are a pretty classic combination.

I also did not want to pipe pretty little swirls on this cake or sprinkle it with chocolate shavings. I needed this cake to be rustic and masculine (pardon my use of gender binaries). Crunchy brown coconut along the edges gives it a strong, almost wooden look. That was perfect.

It boasts a classic chocolate cake with coconut pecan filling and coffee buttercream, garnished with toasted pecans and coconut. The texture is also perfect for those of us that prefer to eat our cake in a bowl with milk, which is how my mother and I have always done it.

This cake is ideal for any coffee lover, chocoholic, or coconut craving. The flavors work in perfect harmony, complementing each other without overpowering. Whether a birthday, a holiday, or simply a weekend, this cake belongs on the table.

INGREDIENTS:
For cake:
2 cups flour
2  sugar
1/4 teaspoon salt
1/2 cup buttermilk
1 teaspoon baking soda
1 teaspoon vanilla
2  eggs
2 sticks unsalted butter
4 tablespoons unsweetened cocoa powder
1/2 cup shredded cocounut
1/4 cup chopped pecans
For frosting:
1.5 sticks softened butter
1/4 cup cocoa powder
1.5 tablespoons instant coffee
2 tablespoons milk of choice
3 cups powdered sugar
For assembly:
Toasted coconut (I throw some in the oven while it’s preheating and while I’m mixing up the cake)
Toasted pecans (Same deal)
1 batch coconut pecan frosting (Can be store-bought or homemade. I used store-bought because I already made one frosting).

To prepare:
Preheat oven to 350
Get your tea kettle going with one cup water. You’ll need it to boil.

In one bowl, combine flour, sugar, and salt (Probably don’t use a metal bowl, because you’re putting boiling water in this later). In another smaller bowl, combine buttermilk, baking soda, vanilla, and eggs.

In a small saucepan over medium heat, combine butter and cocoa powder. Stir until combined and bubbling along the edges. Pour in the boiling water (1 cup) and allow to boil rapidly for a minute.

Pour the chocolate mixture into the flour mixture and stir until slightly cooled. This is why you don’t want a metal bowl, unless you happen to have no nerves in your hands.

Finally, add the egg mixture into the chocolate/flour mixture and stir. Fold in the coconut and pecans.

Pour into two greased 9 inch cake pans (This also makes a sheet cake, or doubles well for a 4 layer). Bake for 20-25 minutes.

For the mocha frosting: Mix together the coffee, cocoa, and milk to form a paste. Add butter and beat until combined. Slowly add the powdered sugar until thick and fluffy.

To assemble: Turn out one cooled cake, spread the coconut pecan frosting on top, really thick. Add a layer of toasted coconuts and pecans.
Turn the other layer out on top. Spread the sides and top with mocha frosting, and press coconut into the sides.
Finally, add a circle of coconut and pecan to the top (it should spread right on top of the mocha. If it’s not working, chill the cake for a second to let the mocha frosting set).
Decorate with pecans and enjoy!


Peanut Butter Cookie Yogurt

C1E71F0A-3003-4193-9808-687FBE5E7E09

This is barely even a recipe. I did not plan it ahead of time, and I did not intend on blogging it.

I was simply trying to get breakfast in my stomach before class. So how did this end up so delicious?

Well, I happened to have a coincidentally magical trio of ingredients within my immediate vision. The play of events went like so:

7:32am: While getting my coffee creamer, I see a lonely tub of plain Greek yogurt that expired tomorrow.

7:36: I pull out the yogurt thinking I can eat it plain. Unfortunately, plain yogurt tastes like sour cream.

7:37: I look up. Sitting on top of my fridge is a jar of local raw honey. I buy it from a friend who raises bees. It is the most delicious honey I’ve ever had.

7:38: Behind the honey I find a tub of powdered peanut butter. Low-fat, low-sugar, and perfect for stirring into smoothies, milk, and…yogurt

7:40: Pure cookie dough bliss

And thus, a regular Wednesday morning became a thing of wonder. The boring routine of bland breakfast had been broken by an awakening of the spirit.

Want to share in my weekday miracle? Mix 1/2 cup of plain Greek yogurt with 1-2 tablespoons of honey and 2 tablespoons of powdered peanut butter.

Yes, I wrote all that for a one sentence recipe, and I am not ashamed!

Messy Citrus Ricotta Cake with Cookie Crumble

cake serving

This is a bit of a hodge podge cake. You know how sometimes you see a recipe that’s like “chocolate coconut cookie dough peanut butter strawberry marshmallow cookies” and you’re like, “Why did anyone create that?” Well, now I know.

Those recipes are clearly created for someone specific in mind, as a means of combining all of their favorite flavors. Someone couldn’t decide what flavor to make for a loved one, because that person never really picks one overall favorite, so they just combined everything. And, naturally, when you spend all of that time developing a recipe, you have to share it, even if it is crazy.

Thus, here I am, sharing a cake that’s a cheesecake layer topped with moist lemon cake topped with whipped orange-vanilla frosting and toasted sugar cookies.  Again, here I am sharing a cake that is so soft and crumbly, I could not get a pretty slice for a picture. Here I am, sharing a recipe that does not fit with my usual POV.

But I am sharing it, because it was delicious, and I made it for my mother. I took all of her favorites and combined them, and we all ate way too much of it. So, for anyone out there that can’t decide between 4 different desserts, here’s a start.

Also, it has riccotta, marscapone, butter, cookies, pudding, and cool whip. So why not share this masterpiece?

INGREDIENTS:

  • 1 standard sized lemon cake mix, plus ingredients to mix it up
  • 30 oz ricotta cheese
  • 6 oz marscapone cheese
  • 1/2 cup sugar
  • 4 eggs
  • 8 oz whipped topping
  • 1 4oz vanilla pudding mix
  • 8 oz canned mandarin oranges (don’t drain)
  • 1.5 cups crumbled sugar cookies
  • 2 tablespoons butter

Preheat the oven to 350

Prepare lemon cake mix according to package directions, and pour into a well-greased 13×9 cake pan

With a whisk, beat together the ricotta, marscapone, and sugar until smooth. Beat in the eggs one at a time, and gently pour mixture over lemon cake mix and spread into an even layer

Bake for 60 minutes, or until a toothpick comes out clean and the lemon cake layer has risen about the cheese layer.

While it’s baking, you can make the cookie crumble. Melt the butter in a skillet. Break up the cookies into course crumbs, and add to the butter. Toss around for about 5 minutes, until it smells like cookies. Spread onto a baking sheet or paper plate to cool.

When the cake is room temp, pop it into the fridge for 20 minutes and get it chilled while you make the frosting.

Combine pudding mix and juice from the mandarin oranges in a large bowl, and whisk until smooth. Gently fold in the whipped topping and oranges until combined.

Spread over the cool cake- use all of it! I promise, you want to. Then, sprinkle on the cooled cookies.

It’s a weird one, but oh my it’s delicious. Enjoy!

Roasted Pears and Grapes with Maple Yogurt Cream

fruit cup

I had a major conflict in my relationship last week: Brent had never seen Julie/Julia! How did that happen? How, over the 4-year course of our relationship, had he never seen my favorite movie?

Add to that, he’d never seen a full episode of The French Chef! There was no way I could stay with a man who did not fully understand the influence of Julia Child on both myself and the entire American food industry. Foodies would not exist without Julia! This blog certainly would not exist.

I would, naturally, have to make a French-inspired meal…in costume. Unfortunately, the French are famous for their buttery, chocolate-dipped, jam-filled pastries. Delicious, but not always in my diet.

So, I started googling classic French fruits. Obviously, being wine country, grapes came right up. Surprisingly, pears were number two.  In fact, pear and grape tarts are a very common French dessert.

I did not really want the carbs, sugar, and effort of a tart. But, the idea of cooked pears and grapes was intriguing. I had seen roasted grapes and sausage before, so I figured it worked. Some quick research revealed that grapes and pears both get sweet and tender when roasted.

The natural sugars pull to the outside of both fruits, making them taste sweetened when I did not add any sugar! They become caramelized and soft. The pears remind me of baked apples, and the grapes taste like little pods of hot grape juice.

Maple seemed like a natural pairing with both pears and grapes: more so than lemon, chocolate, or vanilla, as were my other options. Plus, using maple syrup could cut down on white sugar.

A creamy, maple yogurt on top of hot fruit, with some candied nuts for garnish, suddenly became my healthier French dessert that even Julia would be proud of.

INGREDIENTS (4 small servings):

  • 1/2 cup chopped pecans
  • 3 tablespoons butter
  • 4 tablespoons maple syrup
  • 2 cups chopped Bosc pears (get the chunks to the same size as the grapes)
  • 2 cups red globe grapes
  • 1 cup plain Greek yogurt
  • 1 tsp maple extract
  • 1 tablespoon brown sugar
  • 1 dash allspice

TO PREPARE:

Firstly, make the candied nuts. This can be done days in advance. Brown the butter in a small skillet over medium-high heat. Get it nice and dark. Then, add the pecans and 2 tablespoons maple syrup. Stir occasionally until the nuts smell toasted and the syrup has largely thickened, 15 minutes. The nuts should be slightly sticky but not one big clump. Spread them out on a plate and let dry.

Make the cream: combine yogurt, the remaining two tablespoons maple syrup, the extract, the brown sugar, and the allspice. Taste for sweetness; I like mine pretty sweet, so go easy if you want it more tart. Let chill in the fridge.

Preheat the oven to 350. Grease a baking sheet and spread out the grapes and pears. Spray the top with cooking spray or drizzle with canola oil/butter. Bake for 25 minutes, until the fruits are softened.

Layer fruit in four serving cups, top with nuts, cream, and more nuts.

Bon’ Apetit!


Three-Ingredient Healthy Pumpkin Apple Cobbler

So, I am trying to eat healthy over spring break, because I’d eaten terribly during midterms. Happens to the best of us.

I’d planned healthy dinners all week, and they were all satisfying and flavorful. But, there’s that sweet tooth. It’s a troublemaker, I tell you.

Luckily, I had just what I needed. Normally, berries and fat free whipped cream is my go-to sweet after dinner. That night, however, it was rainy, dark, and 40 degrees. I wanted something warm, with winter spices. I opened the pantry and found a pumpkin cake mix, a can of apple pie filing, and a diet cream soda.

Voila, dessert is done! Actually, this makes a pretty good breakfast too (just sell it as a coffee cake).

It’s a riff on the idea of a dump cake and a soda cake combined. Obviously, you can change the flavors based on what you have. I currently have a vanilla cake mix and a can of peaches next to my extra diet soda, so that combination may happen this weekend.

It really does work. I am not lying to you here. The soda moistens the mix and produces a perfectly normally-textured cobbler or cake. I don’t think it would ever make a fudgy result, but a semi-fluffy, very moist result is pretty much certain.

This recipe is so easy, it’s barely a recipe, but here you go!

INGREDIENTS:

  • 1 pumpkin cake mix
  • 1 can apple pie filling
  • 1 zero calorie canned cream soda (or root beer)
  • Optional: raisins and walnuts, additional cinnamon and pumpkin pie spice, whipped cream

TO PREPARE:
Preheat the oven to 350
Generously grease a 9×9 baking pan
Pour in the apple filling.
In another bowl, mix the cake mix, soda, raisins/walnuts, and pour over the apples.
Sprinkle additional spices on top
Bake for 35-40 minutes, until a toothpick comes out clean

Serve with whipped cream and no guilt! I’m no nutritionist, but a similar recipe I found weighed in at 160 calories for 1/10 of the cake.

Healthy Peach Cheesecake Parfait

parfait

Spring has sprung! And may I just say, THANK GOD. I always get so excited for winter in November, and go crazy with soup, casseroles, cobblers, etc. But, by February I am ready for light, fresh, crunchy things!

It is also the perfect time for fruity, cool desserts! These are usually healthier than baked desserts to begin with, but the right ingredients can make them super skinny .

The best part about this one is the ingredients are mostly pantry-stored. As a college student, I cannot invest in fresh peaches that spoil in a couple of days. Using canned makes this so much easier; I can just whip it up whenever I feel like it!

And let’s face it, marshmallow cream and cheesecake pudding is a mouth-watering combination. Using sugar-free, fat-free pudding made with skim milk keeps the calories down and the flavor up.

Add some crunch with reduced-fat vanilla wafers or graham crackers, and you won’t miss out on any texture and flavor by missing out on fat and calories!
I really can’t sell these anymore. I will say, these are not sugar-free or keto or anything. They are simply a lower-calorie way to satisfy a sweet tooth.  Plus, they’re no-cook and can be made ahead.

Feel free to switch up the pudding flavors, fruits, a cookies! Chocolate pudding, strawberries and reduced-fat Oreos, vanilla with cinnamon graham and cherry. You can’t go wrong!

INGREDIENTS:

  • 1 package instant sugar-free fat-free cheesecake pudding
  • 2 cups skim milk (or whatever the mix calls for)
  • 1 jar marshmallow cream
  • 1 large can peaches packed in juice or syrup
  • 1/2 cup sweetened, shredded coconut
  • 2 cups crushed reduced-fat vanilla wafers or graham crackers
  • fat-free whipped cream, for serving

TO PREPARE:

Mix the pudding and milk as directed by the package. Chill until set.

Fold in the marshmallow cream and chill for another 15 minutes.

In 4 mason jars, layer peaches, coconut, pudding, crackers, peaches, pudding, crackers, whipped cream. The order doesn’t matter that much, I only did this one to avoid direct pudding-to-cracker contact so they don’t get soggy.

These can be served immediately or chilled from the fridge!


Flourless Chocolate Torte with Raspberry Sauce and Ganache

My boyfriend and I had been dating for two years when I moved to college. From the beginning, I mad it abundantly clear that I was going out of state. No boy would change that; if you were in this for the long run, then it would be long-distance.

I don’t think I realized how hard it would be to keep that attitude. I love my school, but I also love him, and the balance between the two is a constant tug. Right before I moved there my freshman year, he came up with my family and I to see the city. I was doing student orientation all day while he oriented himself to campus. We did not see each other until dinner.

We had come upon a random but nice looking Italian place downtown with public parking nearby. We had no recommendations or reasons to assume it was good, but we were hungry and tired and willing to settle.

Two years later, I now know that this is one of the most popular places in town.

Anyway, the meal itself was lovely, but the dessert is why I remember this night. I wanted cheesecake, but when my boyfriend looked at me with those pleading eyes- the “I’m about to say goodbye to you for four years” eyes- and asked to split the chocolate torte, I could not refuse.

To be entirely honest, I did not think it was remarkable. Tortes are typically very light, but this place kept them chilled, making it sink into a very dense hunk of fudge. Naturally, my boyfriend was entirely enthralled in this slice of chocolate bliss.

Since then, he has referenced the torte several times, and we keep meaning to go back to the restaurant and order it. But, there’s always something more pressing to do when he visits, or I want to make dessert for him myself, or we’re broke, etc.

So, when I was picking a dessert for Valentines day this year, I knew what to make immediately. I’d wanted to make it last year, but we ended up doing a Mardi Gras theme and having King Cake. This was the year of the chocolate.

I, however, make my tortes correctly. They are served room temp, so that the texture is a cross between a souffle and a truffle. There are only 5 ingredients in a real chocolate torte; I poured over dozens of recipes to find the perfect balance. Because a torte is so rich, I pour a tart raspberry sauce over the top. For a temperature contrast, a scoop of ice cream with hot ganache takes it to pretentious-baker level. It is not a cloyingly sweet dessert, actually. The torte is rich but not sugary, the sauce is tart… really, the ganache and cream are the sweetest part, and it’s kind of needed to cut the darkness.

So, there’s the personal story and what it tastes like. Here’s the recipe. Why should you make it? It’s easy, impressive, beautiful, make-ahead, romantic, mature, and more than nice enough for company. I really can’t sell it any better: this stuff is the best.

INGREDIENTS:

  • 8 oz unsweetened chocolate
  • 8 oz semi sweet chocolate
  • 2 sticks butter
  • 8 eggs
  • 3/4 cup sugar
  •  1 tsp vanilla extract

For the sauce:

  • 2 cups raspberries
  • 1/2 cup sugar
  • 1/4 cup water
  • 10 oz jar of seedless raspberry jam

Ganache and serving:

  • 1/2 cup heavy cream
  • 1.5 cups semi sweet chocolate chips
  • good vanilla ice cream- like, buy the expensive stuff that stays soft in the freezer. It’s worth it.
  • sea salt, optional

TO PREPARE:

Preheat the oven to 350. Butter the bottom and sides of a 9 inch spring form pan, and dust with cocoa powder. Tap out the excess if you can, but don’t make a mess. I always stress about this part, but tortes have so much butter, they don’t tend to stick anyway.

In a small saucepan over medium heat, melt the chocolate and butter until smooth. Set off the heat too cool.

Beat together the eggs and sugar for 4 minutes until super airy and thick. Once the chocolate is cooled to room temp or just above, fold it into the egg-sugar mixture, along with the vanilla.

Pour into the pan and bake for 30 minutes, until the sides are set and the middle has a teeny bit of jiggle (it’ll set up as it cools)

Let cool to room temp.

While it’s baking, you can make the sauce: Combine the raspberries, sugar, and water in a small pan over high heat. Bring to a boil for four minutes, until all the berries burst. Carefully pour into a blender or food processor with the jam, and blend! I sometimes add a dash of bitters here, if you like. Put the sauce in the fridge to chill.

Right before serving: Heat heavy cream in a small saucepan until simmering on the edges. Pour in the chocolate chips and stir to melt.

Lay a pool of raspberry sauce on the bottom of each plate. Lay a slice of torte on top (it should cut easily with a pie-cutter). Sprinkle with sea salt. Repeat with the other plates.

Scoop ice cream onto each plate, and drizzle raspberry sauce over the top. You’re getting all of the plates done in steps instead of one at a time, because the hot ganache will melt the ice cream. If you did them one at a time, the first plate would be a pool of melted ice cream before you finish the last one.

Finally, pour ganache over the top of everything and serve with a spoon and a fork! A fork for the cake, a spoon for the sauce. Trust me.

Everyone that has tried this in my life freaks out. I hope you do, too.

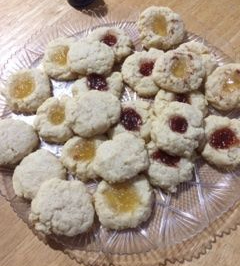
Tender Thumbprint Cookies

nasty

Confession: I do not use my thumb to make the thumbprint in these cookies. My thumb is really small (I have abnormally teeny hands) and all it does is get cookie dough under my nail.

What do I do? I use my middle finger. I debated calling this post “middle finger cookies” for humor, but that seemed a little less than family friendly.

But these cookies? Totally family friendly! I love them because I can make a variety with several different jams, jellies, nuts, or other fillings. So, your fruity child can get his or her fix, while your chocolate lover can get their’s! Or, if you’re me, you opt for the ones you leave plain, with just a sprinkle of sugar on top.

And you serve them with rich hot chocolate covered in whipped cream, to cut the sweetness. 😉

These cookies only bake for ten minutes, but they do require 15 minutes in the fridge to chill. Don’t skip that step! You want all of the butter to harden up so that you get a nice, creamy cookie.

I served these to a friend who was born in the United Kingdom, where shortbread is the most popular cookie, so you know I had faith in these. He ate four, so I think we’re okay!

INGREDIENTS:

  • 1 egg yolk (save the white for breakfast tomorrow!)
  • 1 heaping tablespoon heavy whipping cream
  • 1 heaping teaspoon vanilla (don’t measure this, just go for it)
  • 2 sticks salted butter (or unsalted with some salt)
  • 2/3 cup sugar
  • 2 cups flour
  • Fillings: Apple jam and a sprinkle of cinnamon, pineapple jam, strawberry jam, chocolate spread, a walnut, or nothing!

TO PREPARE:

Preheat the oven to 375, and line two baking sheets with parchment (no need to grease- these cookies don’t stick)

In a small bowl, beat the cream, egg, and vanilla with a fork.

Beat together the butter and sugar until super creamy. Like, 3-4 minutes creamy. Add in the egg mixture. Beat in the flour until combined.

If the dough looks crumbly, add a dash more cream. I swear some days I need it, some I don’t. It’s like the moon cycle determines how crumbly my flour is.

Scoop heaping tablespoons onto the baking sheet. Using your thumb, a small spoon, or your middle finger, create a small indention in the cookies.

After you’ve given all of your cookies the finger, spoon in about half a teaspoon of filling. Don’t overdo it- I know it’s tempting, but save your drippy jelly for your pb&j.

Chill the dough in the fridge for about 15 minutes, until it feels like store-bought cookie dough!

Bake for ten minutes, or until the sides of the cookie are brown. You should be able to poke the jam in the middle and your finger come back clean.

Cheerio!